The steam shower is a room for taking steam bath, which brings the comfort of a spa to your home. It is a typical bathroom shower used for different health purpose as well as mental and physical relaxation.
One can easily place a DIY steam shower into a bathroom, before that we need to ensure the prevention of vapor leaking into the rest of the room. It is considered as one of the luxury items though, but you can easily install a steam shower into your compound. Before moving forward read our handy guide on best steam showers with buying considerations.
In this content, we are going to discuss some primary consideration and steps that you need to know about how to build a steam shower.
How to Build a Steam Shower On Your Own?
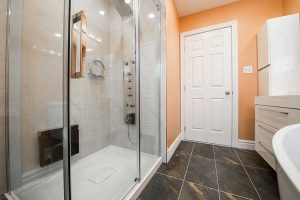
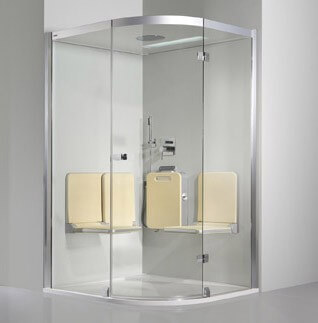
Shower size and seats:
Before placing a steam shower in a bathroom, you need to ensure that there is enough space to place a steam shower correctly. Now comes to the inner part of the steam shower, there should have enough volume where you can sit with comfort.
But one thing you need to keep in mind that capacity should be in limit so that it consumes limited power planned for your home. It is better to use a comfortable and slightly sloped seat. In case of smaller shower use folded seat to maximize the space but if space isn’t an issue than some use the tiled or wooden bench instead.

Shower location:
From some observation, we found that a steam shower can be placed in any corner or middle place depending on shower shapes. You need to keep in mind about the height and volume of the shower. For the longer result, the steam shower should be located away from the outside wall during the winter season.
Shower door and windows:
As steam shower block off rest of the room, so the door is adequately an unheated space. The door needs to be water-tight not air-tight as you should confirm the vapor to lock into the shower space. During winter, the outside wall will be cold if you left the door closed so you can plan to leave the door open. Or else install a radiant heat which keeps the shower dry.
Make sure to seal the window in that particular area where you are about to fix it. Also, skylight should not enter the place where the shower is placed.
Also Read: 10 Best Rainfall Shower Heads 2020
Ceiling height and slope:
A critical segment to consider before installing is the ceiling of the steam shower. Considering the fact of space and power usage, a lower ceiling is ideal for the shower. It should be approximately 8 feet but not more than that. Sloped ceiling is considered sometimes to prevent dripping down. For the residential user, ceiling sloped a half inch per foot away from the user, and for commercial, ceiling a two inch per foot is used.
Materials:
Materials used in ceiling and walls have to be non-absorptive. Avoid using materials like granite, marble, and concrete. If the material is higher porous, then it will expend heat. As a result, you need larger and powerful steam generator. So use non-absorptive materials like ceramic, porcelain tile that will hold heat. Also, add an anti-drift strip on the floor to avoid the chances of slipping.
Steam generator utilities and location:
Before place a steam generator you need to make sure the access of plumbing, electricity where plumbing line includes a water connection to the generator and a steam line from the generator to the steam room and drain line. For electric supply, 240 volts with an attached circuit breaker is used. The steam generator needed to be placed within 60 feet of your steam room.
Some experts said that 25 feet distance from the shower is ideal. Adjacent closet, vanity, and the heated attic is the better option for service access. Remember that, do not install in an actual steam room or in an anywhere where water might freeze. The steam head should be located six to twelve inches above on the floor.
Also Read: Best Shower Faucets 2020
Luxury stuff:
Modern steam shower provides some luxury feature such as lighting, FM radio, shower speaker, television, radio, telephone, foot messengers and aromatherapy, etc. Use vapor lighting fixture protected by ground fault circuit interrupter (GFCI) which will shut off the power if detects moisture in the appliance.
Taking these things into account, you may proceed to start the installation. Some necessary steps for designing and building your steam shower is discussed below.
Basic steps for installing a DIY steam shower:
Step 1: Choose and prepare the wall:
Wall material will affect the steam nature and the amount of power needed for the steam room. The heavier non-porous material will require more heat. The manufacturer calculates these heat factors and construction material. So choose a material that consumes less power and reflects the heat. Seal the wall to prevent the moisture. Several layers are burnished in the wall where the first layer is a vapor barrier and then cover it with a layer of durock wallboard. This board is resistant to water and then place non-porous tiles above that.
Step 2: Install shower enclosure:
Before installing the shower enclosure prepare the base in a way that it completely drains away the water. Ensure the placement of base by using spirit level after that place the wall and attach it using self-tapping screws with the base.
Step 3: Place a proper circuit:
Make sure to install a grounded electrical circuit which is separated from the main circuit used in the home. The isolated circuit is required to protect you from electrical shock while using. So that makes sure to install by a professional electrician who connects the wires safely.
Step 4: Install an exhaust fan for ventilation:
Experts suggest installing a ventilation duct and fan to prevent excess moisture and avoid mold and mildew. Exhaust fan should be placed outside the steam room. A good quality bathroom dehumidifier is also recommended.
Step 5: install the door:
After all, the set-up shower enclosure walls are ready to set an entry. You can now take the proper measurement of the door and make sure to place a water-tight door. Also, keep the door open so that inside walls always remain dry.
Step 6: Placement of accessories:
To install steam, you need a steam shower kit. Other than that, if you are willing to place an audio system steam shower wall is not the best place as there is a chance of echo happens inside. The ceiling would be the ideal place for audio system which will prevent the sound from reaching other room. Same things applied for other accessories like FM radio, telephone too.
Also read: Best grout sealer for shower floor 2020
And Finally:
Before using the shower, you should run the water for 5 to 10 minutes to inhibit any chemical reaction to happen in the pipe. Check the controls on the shower kits and also check the electrical connection properly. Taking a steam bath can wash away all your exhaustion after a busy day, or it can give you a kick start in the morning. But overuse of a steam shower is not recommended. That’s all for now. I hope you have learned about How To Build A Steam Shower by yourself. We will meet again soon with other useful tips and tricks. Till then:
Stay Connected!

As the resident shower expert at ShowerJournal.com, Wayne Lee loves to share the helpful tips and tricks he’s picked up over the years during his job as a handyman.
What is the approximate budget for an average steam shower installation?
Somewhere between 2-3 thousand.